
In this article, I will give detailed instructions for setting up a DLNA server in Windows 11. I will tell and show you how to connect a TV and a laptop or computer with Windows 11 using DLNA technology and watch videos, photos, or listen to music on the TV on the computer. This method is very convenient to display movies on TVs, media players, smartphones. Everything works on a local network, through a router. There is no need to use a flash drive or external hard drive. You can immediately send a movie from your computer to your TV using the built-in functions in Windows 11 or third-party programs.
DLNA is just one way to connect a TV to a computer. You can also use an HDMI cable for this (then the TV will work as a monitor), or Miracast wireless technology in Windows 11. But for watching movies or photos, I would recommend DLNA. Or use a USB stick.
How to connect a TV and a laptop (PC) on Windows 11?
To transfer media content via DLNA between a computer and a TV, you will not need:
- Laptop or PC with Windows 11 installed.
- TV with Smart TV. If you have smart TV (Internet connection function), so there is support for DLNA. If you have a non-smart TV, you will need a special TV adapter.
- Wi-Fi router to which the computer and TV should be connected (adapter).
Important: TV and laptop or PC must be connected to the same router. Only in this case they will be in the local network. Media content is broadcast over the local network (not via internet). You can connect devices using a network cable, or via a Wi-Fi network. In the case of a Wi-Fi connection, you need to connect to the main network, and not to the guest network. Since in the guest Wi-Fi network, the local network is usually disabled.
Note: using DLNA on the TV, you can only watch videos and photos, as well as listen to music that is stored on your computer’s hard drive. Not online. That is, you can only send files to the TV.
Transfer to device feature in Windows 11
To quickly start streaming a movie from Windows 11 to your TV, you can use the Cast to Device feature. Now I’ll show you how it works. The main condition: the TV and the computer are connected to the same network.
Further points:
- Open a folder with a video, photo, or music, right-click on the file that you want to broadcast via DLNA to your TV, select “Show advanced options”.

- A full menu will open, where we need to click on the “Transfer to device” item. There should be our TV. It may be that there will be two devices with the name of your TV. In this case, to transfer the file via DLNA, you need to select the device near which the icon in the form of a gray box with a green “Play” button.
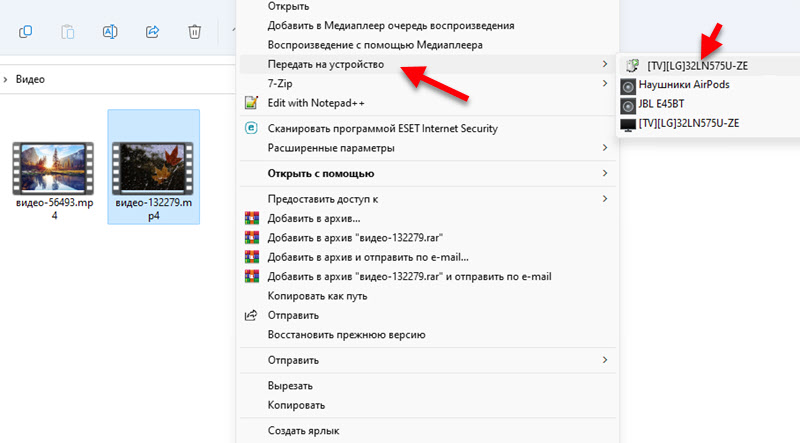 If you, like me, display the name of the TV with an icon in the form of a black TV (last one on the list in the screenshot above), then it is a Miracast transmission. If you are interested in this method – you can try. More details in this article.
 - Video (photo, music) should immediately start playing on the TV.
 I put the TV next to the computer just for the photo. They are not connected by cable.
 - In Windows 11, a small player will open at this moment, through which you can control the playback of files using DLNA technology.
 There you can pause playback, add new files to the queue (just drag and drop them to the player)switch between video and music, start repeat playback, rewind (rewinding via DLNA does not always work, there may be a “Search does not work” error, depending on the file and TV)adjust the volume.
Very convenient and fast way. True, in this way it is impossible to view all files and start playing movies and other files from the TV. But there is another way (without third-party software, standard Windows 11 tool)which allows you to fix it.
Setting up DLNA (Media Streaming) in Windows 11
You can turn on media streaming in Windows 11, share folders with videos, photos, music, or add the desired folder to the library and you can launch files through File Explorer from the TV (or through a special application, they are different on different TVs).
- To enable media streaming and thereby create a DLNA server in Windows 11, you need to open the start menu and start typing “Media Streaming Settings”. Then select the appropriate item.

- The control panel will open. There you need to click on the “Turn on media streaming” button.

- A list of devices on the local network will immediately appear. There should be our TV (if everything is properly connected and it is turned on). You can also change the name of the media library (it will be displayed on TV)and optionally deny or allow access to the server for a specific device.
 If you change any settings there, do not forget to click on the OK button. The DLNA server in Windows 11 is already running and should be displayed on the TV.
 - On TV, menu (usually in the Smart TV menu) you need to run the application to view the content of the available servers. On older LG TVs (as in my case), this is a SmartShare app. On the new ones – “Photo and Video”. On Philips TVs, the application for viewing content via DLNA is called “Media”.
 I think you can easily find it on your TV. If so, write in the comments. The server that we launched on the computer should already be displayed there.
 - Then we simply open this server on the TV and watch the content in folders. There is sorting: Video, Photo, Images, Playlists. By opening the Videos folder, for example, you can search for content by genre, ratings, etc., or simply open Folders and view those folders that are shared on your computer. Or open “All videos”. I think you’ll figure it out there.
Adding your folders with files to the library
By default, only shared folders are accessible. But rarely someone stores video and other media content there. Now I’ll show you how to add any folder to the library (for example, the folder with movies, which is located on drive D)so that it can be accessed from the TV.
- Right-click on the desired folder and select “Show advanced options”.

- Then click on “Add to Library” and select “Video” (or photo, music, depending on what you add).

- It will immediately become available on TV. In my case, I choose Video – Folders and my folder is displayed there. I open it and see the files that are in this folder on the computer. Now I can select and run any file from the TV.
 Thus, any folder with any media content can be added to the library. And Windows 11 will immediately display it on the TV through a running DLNA server.
 - You can view and delete folders from your library right in File Explorer.
 You can delete or add any folder there.
Problems and errors when setting up DLNA
How much I have already set up this scheme, everything works stably. Yes, and the transmission goes without freezes and breaks. But still there are a few questions that I want to answer and explain what to do if you encounter them.
Windows 11 does not see the TV or vice versa
It happens that in the list of devices in the “Transfer to device” menu there is no TV. Or when the TV does not find the DLNA server running on the computer. In this situation, we do this:
- Checking the PC connection (laptop) and TV to the router. You can check if you have internet access. Check which network the devices are connected to.
- Make sure they are not connected to the guest Wi-Fi network, but to the main one (if connected via Wi-Fi, not cable).
- Unplug the TV from the outlet for 10 minutes, restart the computer and router.
- Set the network profile type to “Private network” in the network properties. This can be done in the Windows 11 settings according to this instruction.
- Try disabling the firewall in Windows 11 and/or the built-in antivirus.
TV says video or audio is not supported
A very popular issue. The fact is that TVs do not support all video and audio file formats. And if, for example, you play a movie in a format that is not supported by your TV (video or audio track)then the error “This file type is not supported”, or “The audio format is not supported” will appear.
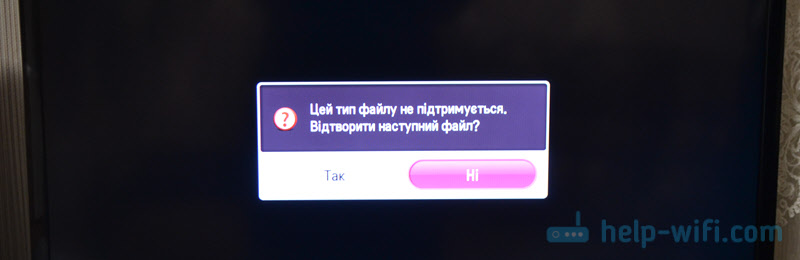
The error itself, as well as the list of supported formats, may differ depending on the TV. On the website of the TV manufacturer, in the characteristics of your model, you can see a list of supported video, music, picture and subtitle formats.
What can you try to do? Install some third-party player from the app store and open it through it. If it doesn’t work (which is most likely)then you will have to look for this file in a different format, or convert it yourself.
DLNA video slows down, freezes, sound lags behind
Sometimes there are problems with video playback: stops, freezes, out of sync, etc. Especially when broadcasting video in high quality, when the file itself weighs several tens of gigabytes.
This is all due to the lack of bandwidth between the TV and the computer. Simply put, a low connection speed between a computer and a router, or a TV and a router. Also, the reason may be in a weak router, Wi-Fi laptop / PC adapter (if connected via Wi-Fi), TV. I can also assume that the matter may be in the low performance of the TV itself.
What to do in this case? You can try increasing your connection speed. For example, a slow speed may be due to a bad signal. If possible, connect the computer / TV to the router via cable, and not via Wi-Fi. When connecting wirelessly, try to use the 5 GHz band.